
TinyRTCの時刻データをPICマイコン(PIC12F1822)とI2C通信で受信しました。
使用パーツ
リアルタイムクロックモジュール (DS1307) ¥175
https://electronicwork.shop/items/66968597a18e8d095b23ae7c
TinyRTCの本家かコピー品かわかりませんが。
PICマイコン PIC12F1822-I/P ¥200
https://akizukidenshi.com/catalog/g/g104557/
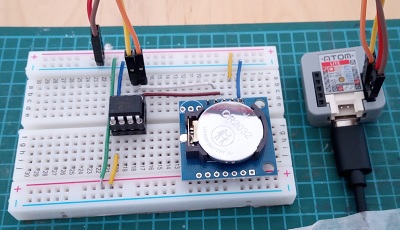
配線
PIC              TinyRTC
RA1(Pin6) <----> SCL
RA2(Pin5) <----> SDA
VCC/GND: 5V接続
TinyRTCの方で、3.3kΩでプルアップされているので、プルアップ抵抗は要りません。
ATOM Liteもあるのは、ちゃんと時刻データが取得できているかを、スレーブ化したATOMから時刻を確認するためです。
スレーブ化はこちらの記事です。
ソースコード
PIC12F1822側
#include
#include
#include
#include
//config1
#pragma config FOSC=INTOSC  // 内部オシレータ使用
#pragma config WDTE=OFF     //Watchdog Timer off
#pragma config PWRTE=ON     //Power up timer on(スイッチを入れた直後電源が安定するまで待つ)
#pragma config MCLRE=ON     // MCLRピンをリセットとして使用
#pragma config CP=OFF       //CODE PROTECT OFF プログラムの読み出しのプロテクトoff
#pragma config CPD=OFF      //Data Protect OFF データ領域の読み出しのプロテクトoff
#pragma config BOREN=ON     // Brownout on (もし電源が不安定のとき一時停止する)
#pragma config CLKOUTEN=OFF // CLOCK 信号の外部出力をOFF
#pragma config IESO=OFF     // 2段階クロックoff(立ち上がりで即安定する内部クロックを使いその後外部クロックに切り替える設定)
#pragma config FCMEN=OFF    //Fale-safe Clock Monitor off(外部クロックが壊れたとき内部クロックに切り替える設定)
//config2
#pragma config WRT=OFF      //Write Protection プログラム領域の書き込み禁止 off
#pragma config PLLEN=OFF    //クロック逓倍off (onにすると発生したクロックが4倍になる)
#pragma config STVREN=ON    //スタック領域をオーバーしたらリセットする(offは何もしない)
#pragma config BORV=LO      // Brounout電圧設定 (HI:電源電圧がちょっとさがるとリセット、LO:うんと下がるとリセット)
#pragma config LVP=OFF      //プログラム書き込み電圧(ON;低電圧書き込み有効 マイコンの電圧で書き込める off:低電圧書き込み無効 PICKIT3のときoffに)

#define _XTAL_FREQ 2000000  //内部clock2MHz for delay macro
#define RTC_ADDR   0x68    // DS1307の7bitアドレス
#define ATOM_ADDR  0x30    // ATOM Liteの7bitアドレス

void I2C_Init(){
    // I2C設定 (100kHz用)
    SSP1ADD = 4; // 2MHz時の計算値
    // --- I/Oピン設定 ---
    ANSELA = 0x00;      // 全てのピンをデジタルI/Oに設定
    TRISA  = 0b00000110; // RA1(SCL)とRA2(SDA)を入力に設定(MSSPが制御するため)
    SSP1STAT = 0x80;    // 標準速度 (100kHz)
    SSP1CON1 = 0x28;    // I2C Master mode, SSP Enable
}

void I2C_Wait() {
    while ((SSP1STAT & 0x04) || (SSP1CON2 & 0x1F));
}

void I2C_Start() {
    I2C_Wait();
    SSP1CON2bits.SEN = 1;
}

void I2C_Stop() {
    I2C_Wait();
    SSP1CON2bits.PEN = 1;
}

void I2C_Write(unsigned char data) {
    I2C_Wait();
    SSP1BUF = data;
}

uint8_t I2C_Read(uint8_t ack) {
    uint8_t temp;
    I2C_Wait();
    SSP1CON2bits.RCEN = 1;
    I2C_Wait();
    temp = SSP1BUF;
    I2C_Wait();
    SSP1CON2bits.ACKDT = (ack ? 0 : 1);
    SSP1CON2bits.ACKEN = 1;
    return temp;
}

// UNIX時間を4バイトに分解して送信する関数
void I2C_Send_UnixTime(unsigned char slave_addr, unsigned long unix_time) {
    I2C_Start();
    I2C_Write(slave_addr << 1); // アドレス送信 (Writeモード) // 上位バイトから順に送信 (ビッグエンディアン形式) I2C_Write((unsigned char)((unix_time >> 24) & 0xFF));
    I2C_Write((unsigned char)((unix_time >> 16) & 0xFF));
    I2C_Write((unsigned char)((unix_time >> 8)  & 0xFF));
    I2C_Write((unsigned char)(unix_time & 0xFF));

    I2C_Stop();
}

// BCDから10進数への変換
uint8_t bcd_to_decimal(uint8_t bcd) {
    return ((bcd >> 4) * 10) + (bcd & 0x0F);
}

// --- UNIX時間計算関数 ---
// 簡易版: 2000年〜2099年対応
uint32_t get_unix_time(uint8_t y, uint8_t m, uint8_t d, uint8_t hh, uint8_t mm, uint8_t ss) {
    uint32_t t;
    uint16_t y_full = 2000 + y;
    uint8_t months[] = {31, 28, 31, 30, 31, 30, 31, 31, 30, 31, 30, 31};

    // 1970年からの経過年数による秒数 (2000年1月1日まで = 946684800秒)
    t = 946684800;

    // 2000年から指定年前年までの経過日数を加算
    for (uint16_t i = 2000; i < y_full; i++) {
        t += 31536000; // 365日
        if ((i % 4 == 0)) t += 86400; // うるう年
    }

    // 今年の経過月による日数を加算
    if (y_full % 4 == 0) months[1] = 29;
    for (uint8_t i = 0; i < m - 1; i++) {
        t += (uint32_t)months[i] * 86400;
    }

    // 日・時・分・秒を加算
    t += (uint32_t)(d - 1) * 86400;
    t += (uint32_t)hh * 3600;
    t += (uint32_t)mm * 60;
    t += ss;

    return t;
}

void main() {
    // OSCCON設定 (2MHz)
    // IRCF = 1100 (2MHz内部クロック)
    OSCCON = 0b01100000;

    I2C_Init();

    uint8_t sec, min, hour, day, month, year;
    uint32_t current_unix_time;

    while(1) {

        // RTCから時刻を読み出す
        I2C_Start();
        I2C_Write(RTC_ADDR << 1);  // 書き込みモードでRTC指定
        I2C_Write(0x00);         // レジスタアドレス0(秒)を指定

        I2C_Start();             // リスタート
        I2C_Write(RTC_ADDR << 1 | 1); // 読み出しモード
        sec  = bcd_to_decimal(I2C_Read(1)); // 秒 (ACK)
        min  = bcd_to_decimal(I2C_Read(1)); // 分 (ACK)
        hour = bcd_to_decimal(I2C_Read(1)); // 時 (NACK)
        I2C_Read(1); // 曜日 (不使用なので読み飛ばし)
        day   = bcd_to_decimal(I2C_Read(1));
        month = bcd_to_decimal(I2C_Read(1));
        year  = bcd_to_decimal(I2C_Read(0)); // 最後はNACK
        I2C_Stop();

        // ATOM Lite (アドレス0x30) へUNIX時間を送信
        current_unix_time = get_unix_time(year, month, day, hour, min, sec);
        I2C_Send_UnixTime(ATOM_ADDR, current_unix_time);

        __delay_ms(1000); // 1秒おきにデバッグ送信
    }
}
ほぼ、Gemini先生任せ(笑)